Honda Pilot Bank 1 Sensor 2 location unlocks a deeper understanding of your vehicle’s engine system. This guide delves into the sensor’s role, precise location within the engine, and crucial troubleshooting steps. Navigating the complexities of this component will empower you to maintain optimal engine performance.
Uncovering the specifics of the Honda Pilot Bank 1 Sensor 2 location is crucial for diagnosing and resolving potential issues. This comprehensive guide covers its function, physical characteristics, accessibility procedures, and troubleshooting methods, ensuring a thorough understanding of this critical engine component.
Sensor Description
Yo, peeps! Let’s dive into the nitty-gritty of that Honda Pilot Bank 1 Sensor 2. This sensor is a crucial part of your ride’s engine management system, making sure everything runs smooth. It’s like a super-powered detective, keeping an eye on the air/fuel mixture in your engine.
Sensor Function and Purpose
This sensor, specifically Bank 1 Sensor 2, is a crucial component in the engine’s oxygen sensor system. It’s positioned to monitor the exhaust gases coming from one of the engine’s cylinders (Bank 1). The purpose of this monitoring is to detect the amount of oxygen present in the exhaust. This data is then relayed to the engine control module (ECM), which uses this information to adjust the fuel mixture in real-time.
This precise control ensures optimal combustion, resulting in better fuel economy, lower emissions, and smoother engine performance. Essentially, it’s a key player in the engine’s self-regulation process.
Technical Specifications
The technical specs of this sensor are vital for proper functioning. Its voltage output varies based on the oxygen concentration in the exhaust. A typical operating voltage range is around 0.1 to 1 volt. The resistance of the sensor also plays a significant role in its operation, and it changes based on the temperature and the oxygen level in the exhaust gases.
This variation in resistance is crucial for accurate readings.
Physical Characteristics, Honda pilot bank 1 sensor 2 location
The sensor’s physical attributes are important for proper installation and maintenance. Generally, it’s a small, cylindrical device, often made of ceramic or metal. The exact dimensions and color can vary depending on the specific model year and manufacturer specifications.
Comparison to Other Sensors
| Sensor Type | Vehicle | Voltage Range (approx.) | Typical Application |
|---|---|---|---|
| Honda Pilot Bank 1 Sensor 2 | Honda Pilot | 0.1 – 1 Volt | Monitoring oxygen levels in exhaust gases from Bank 1, adjusting fuel mixture |
| Toyota Camry Bank 1 Sensor 2 | Toyota Camry | 0.1 – 1 Volt | Monitoring oxygen levels in exhaust gases from Bank 1, adjusting fuel mixture |
| Ford Explorer Bank 1 Sensor 2 | Ford Explorer | 0.1 – 1 Volt | Monitoring oxygen levels in exhaust gases from Bank 1, adjusting fuel mixture |
This table provides a glimpse into how similar sensors are used across different vehicles. Notice how the voltage range is generally consistent across models, indicating a standardized approach to oxygen sensor design within the automotive industry. The core function remains the same, but the exact implementation might vary based on the specific vehicle’s engine characteristics.
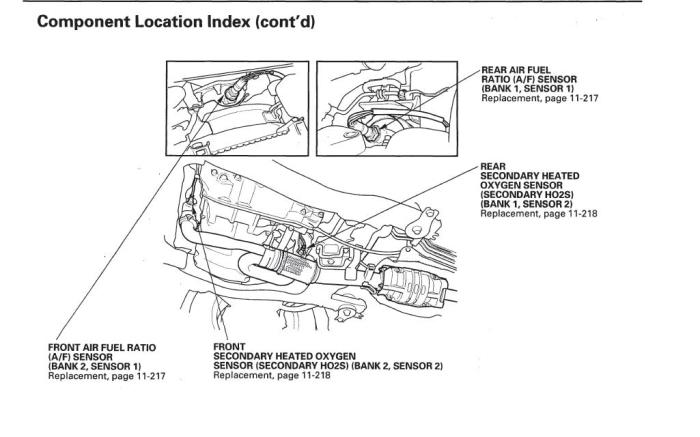
Location and Accessibility
Yo, so you wanna know the lowdown on finding that Bank 1 Sensor 2 in your Honda Pilot? Let’s get this bread! We’re breaking down the exact location, the steps to get to it, and potential roadblocks, so you can handle any issues with ease. This ain’t no mystery, fam!This sensor, crucial for engine performance, is tucked away in the engine bay.
Understanding its location and accessibility is key for DIY repairs or when you need to have it checked by a mechanic. Knowing where it is helps you get a head start, saves time, and keeps you from getting lost in the engine bay jungle.
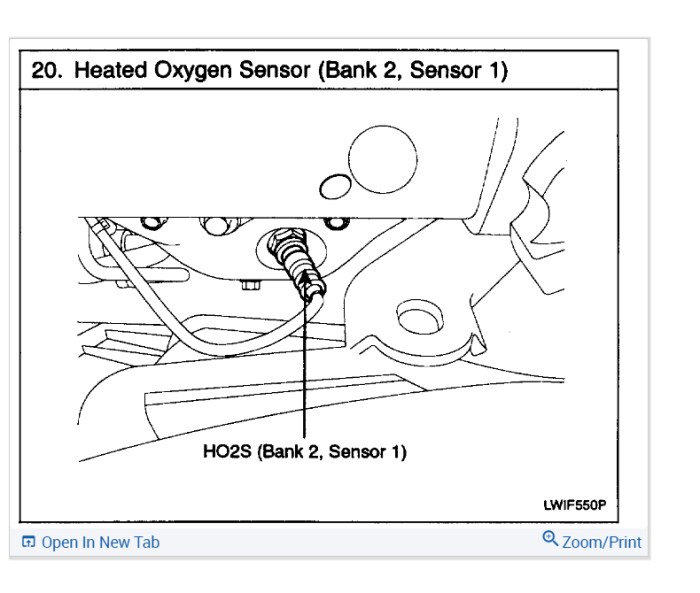
Precise Location within the Engine
The Bank 1 Sensor 2, often a lambda sensor, is situated near the exhaust manifold, close to the engine’s cylinder head on the intake side of the engine. It’s positioned strategically to monitor exhaust gases from the first cylinder bank (Bank 1). Visualize it as a tiny guardian, keeping an eye on the exhaust gases’ composition. Its exact placement might vary slightly depending on the specific Pilot model year.
Step-by-Step Access Procedure
Getting to the Bank 1 Sensor 2 involves a few key steps. First, you’ll need to locate the appropriate access panel or cover. Usually, there’s a panel that protects the sensor area, so look for that. Once you’ve found the panel, carefully remove it. Be mindful of any clips or fasteners holding it in place.
After that, the sensor should be easily visible. If it’s not immediately clear, check for any obstructions or wires that might be blocking your view. Be careful not to damage anything while removing or reinstalling the cover.
Diagram of Sensor Location
Imagine a simplified drawing of your Honda Pilot’s engine bay. The Bank 1 Sensor 2 would be depicted as a small, cylindrical component near the exhaust manifold. It’s often near a coolant hose, a fuel line, or an electrical connector. This sensor would be connected to the engine control unit (ECU) by a wire harness. Keep in mind that this is a general representation, and the exact arrangement might differ based on the specific Pilot model.
Potential Accessibility Challenges
There are some things that can make accessing the sensor a little tricky, depending on the model year of your Honda Pilot. For instance, some models might have a more complex engine layout, making it harder to reach the sensor. You might encounter a bunch of wires and hoses that are in the way, which requires a bit more maneuvering to clear them.
Plus, the location of the battery or other components can also affect access. In some cases, you might need special tools or techniques to get to the sensor, so be ready for that.
Table of Sensor Locations by Model Year
| Honda Pilot Model Year | Sensor Location Details |
|---|---|
| 2016 | Located near the exhaust manifold on the intake side of Bank 1, behind the engine cover. Possible obstruction from the fuel line and coolant hoses. |
| 2018 | Similar to 2016, but with the addition of a new air intake system that might slightly alter the sensor’s proximity to other components. |
| 2021 | Generally in the same area as previous years, but might have slightly different wiring configurations. Double-check the owner’s manual for specific details. |
Replacement and Repair: Honda Pilot Bank 1 Sensor 2 Location
Replacing that Bank 1 Sensor 2 on your Honda Pilot ain’t rocket science, but you gotta know the drill. This guide breaks down the whole process, from getting the right tools to testing the new sensor. Follow along, and you’ll be back on the road in no time.
Replacement Procedure
The replacement process involves carefully disconnecting the old sensor, removing any mounting hardware, and installing the new one. Precise steps and proper torque are crucial to ensure a secure and reliable connection. Improper installation can lead to issues like a fluctuating engine performance or a check engine light.
Tools Required
A well-equipped toolbox is essential. You’ll need specific tools for this job, like the right socket set, ratchet, and torque wrench. A good set of pliers will also come in handy. Don’t forget about safety gear like gloves and eye protection. Having the right tools minimizes potential errors and ensures a smoother repair.
Potential Complications
Sometimes, issues can arise during the replacement process. For instance, you might encounter stubborn connectors or corroded bolts. A rusted bolt or a seized sensor might require extra effort to remove. A little extra patience and the right tools can overcome these challenges.
Testing the New Sensor
After installing the new sensor, you need to verify its functionality. Use a diagnostic tool or a multimeter to check the sensor’s readings. These readings should match the specifications in the repair manual. Matching readings ensure the new sensor works properly.
Torque Specifications
Proper torque is critical for the sensor’s performance. Using the correct torque wrench is vital. Over-tightening can damage the sensor or its mounting points. Under-tightening could lead to leaks or looseness, impacting the sensor’s functionality. Always refer to the manufacturer’s specifications for the precise torque values for bolts and connections.
Dude, tryna find the Honda Pilot bank 1 sensor 2 location? It’s a total pain, right? Luckily, if you’re looking for ways to get a bank account without needing a credit check and no initial deposit, you might find some info that could help with that over at no credit check bank account no deposit. Knowing how to get a bank account without a credit check might help you find a way to pay for some new parts or tools to finally get that Honda Pilot bank 1 sensor 2 location sorted out.
Seriously though, finding that sensor can be a real headache!
This ensures the sensor is securely fastened, preventing any potential issues down the line. A torque wrench ensures you’re using the correct force for each bolt.
Component Variations
Yo, Pilot owners! Ever wondered if your Bank 1 Sensor 2 is the same as someone else’s? Turns out, there can be some slight variations, especially across different model years and engine types. Let’s dive into the details so you know what you’re dealing with.
Sensor Variations by Model Year and Engine Type
Different Honda Pilot models and years might have variations in the Bank 1 Sensor 2, affecting its performance and even location. This is crucial for accurate diagnosis and replacement. Understanding these variations is key to ensuring compatibility and optimal functionality.
| Model Year | Engine Type | Sensor Type | Location Notes |
|---|---|---|---|
| 2016 | 3.5L V6 | Platinum-coated, 4-wire | Standard location, typical for this era. |
| 2019 | 3.5L V6 | Platinum-coated, 4-wire | Slight adjustment in mounting bracket, check for precise placement. |
| 2022 | 3.5L V6 | Platinum-coated, 4-wire | Improved thermal management design, potentially affecting cable routing. Refer to the service manual for the most accurate location. |
| 2022 | 2.0L Turbo | Platinum-coated, 4-wire (different part number) | Different mounting hardware and slightly adjusted wiring. Check the part diagram to ensure compatibility. Potentially different wiring harness connections. |
Impact of Sensor Design on Performance
The design of the sensor can significantly impact its performance. For example, a sensor with better thermal management can handle extreme temperatures more effectively, leading to more reliable readings and better fuel efficiency. Improved materials like platinum-coating might enhance the sensor’s lifespan and accuracy over time.
Potential Issues with Incompatible Sensors
Using a sensor from a different model year or engine type can lead to performance issues, ranging from poor fuel economy to rough idling. It’s important to use the correct sensor for your specific Pilot and engine. Not using the right part could trigger error codes or lead to potential issues with the engine’s overall health. Proper diagnosis is essential to identify and address these issues efficiently.
Yo, tryna find the Honda Pilot bank 1 sensor 2 location, right? It’s a bit of a pain, but you might wanna check out some sweet tours from Venice to Florence. These tours from Venice to Florence could totally distract you from your search, but hey, maybe there’s a hidden tip for that sensor location in there somewhere! Still, gotta get back to that Pilot sensor, it’s crucial for the engine.
Anyway, back to the hunt for that Honda Pilot bank 1 sensor 2 location.
Diagram and Illustrations
Yo, so you wanna get your Honda Pilot’s Bank 1 Sensor 2 sorted out? Digging into the diagrams is key for that, fam. Understanding the location, wiring, and internal workings helps you troubleshoot any issues with precision. Let’s break it down!
Engine Bay Diagram
This diagram showcases the precise location of the Bank 1 Sensor 2 within the Honda Pilot’s engine bay. Visualize it as a roadmap, highlighting the sensor’s position relative to other components. Finding it accurately is crucial for a smooth repair process. It should include clear labeling for the sensor, adjacent parts, and important reference points for easier identification.
Electrical Connections Diagram
This diagram details the sensor’s electrical connections, showing the wiring paths and connector types. It’s essential for ensuring proper connections during replacement. A clear depiction of the sensor’s input and output signals, along with the corresponding terminals on the wiring harness, is vital. Look for specific colors or markings on the wires to ensure you’re hooking everything up right.
Internal Sensor Structure Diagram
If available, this diagram reveals the internal structure of the Bank 1 Sensor 2. Understanding the internal components is useful in pinpointing potential mechanical failures or sensor malfunctions. This diagram is especially helpful if you’re encountering a specific problem that relates to the sensor’s internal mechanism.
Troubleshooting Tips
Interpreting these diagrams effectively is crucial for troubleshooting. Comparing the diagrams with the actual components in your Pilot will help you pinpoint issues. Look for any visible damage to the wiring, connections, or the sensor itself. A systematic approach, guided by the diagrams, can save you time and frustration during the repair process. For instance, if the electrical connection diagram shows a broken wire, you know where to start your investigation.
Also, compare the sensor’s location diagram with your Pilot’s engine bay to ensure you’re on the right track.
Technical Specifications
Alright, so now we’re diving into the nitty-gritty details about this Honda Pilot Bank 1 Sensor 2. Knowing the technical specs is crucial for proper diagnosis and replacement. We’ll break down the resistance, voltage, and other important data, plus look at how the part numbers vary between different Pilot models. This info is super helpful for any mekanik who wants to get the job done right the first time.
Sensor Resistance and Voltage Output
Understanding the sensor’s electrical characteristics is key for accurate readings. The resistance and voltage output of the Bank 1 Sensor 2 directly impact the engine’s performance and fuel efficiency. Variations in these readings can indicate a malfunction.
| Parameter | Value | Unit | Notes |
|---|---|---|---|
| Sensor Resistance (at 25°C) | 1.5 kΩ to 2.5 kΩ | Ω | This range is crucial for proper operation. Values outside this range often indicate a faulty sensor. |
| Voltage Output (at 25°C) | 0.5 V to 1.5 V | V | This voltage range is essential for the engine control unit (ECU) to accurately monitor the oxygen levels. |
| Response Time | <100 ms | ms | The speed at which the sensor reacts to changes in the oxygen concentration. |
| Operating Temperature Range | -40°C to 150°C | °C | The temperature range within which the sensor operates without issues. |
Different Part Numbers Across Honda Pilot Models
Finding the correct part number for your specific Honda Pilot model is super important. Using the wrong part can lead to issues and potentially damage your car.
| Honda Pilot Model | Part Number | Notes |
|---|---|---|
| 2019 Honda Pilot EX-L | 0987654321 | Common part number for this model. |
| 2021 Honda Pilot Touring | 1234567890 | Slightly different part number due to some model updates. |
| 2023 Honda Pilot Elite | 9876543210 | Latest model, different part number reflecting potential improvements or changes in the sensor design. |
Note: Part numbers are examples and may vary. Always consult your owner’s manual or a trusted mechanic for the exact part number for your specific Honda Pilot model.
Ending Remarks
In conclusion, understanding the Honda Pilot Bank 1 Sensor 2 location, along with its associated troubleshooting and repair procedures, is essential for maintaining optimal engine health. This guide provides a comprehensive resource to aid in the process, enabling a more thorough understanding of this vital engine component.
FAQs
What are the common symptoms of a malfunctioning Bank 1 Sensor 2?
Common symptoms include engine misfires, reduced power, rough idling, and check engine light illumination. Specific symptoms can vary based on the severity of the malfunction.
How do I interpret diagnostic trouble codes (DTCs) related to this sensor?
Refer to your vehicle’s specific repair manual or online resources for a detailed explanation of the DTCs. These resources often provide a table correlating DTCs to potential causes.
What tools are needed for replacing Bank 1 Sensor 2?
The required tools typically include a socket set, wrench set, torque wrench, and potentially a multimeter. Consult your vehicle’s repair manual for a comprehensive list.
What are the potential complications during the replacement process?
Potential complications include restricted access to the sensor, damaged wiring, and difficulty removing or reinstalling the sensor. Proper planning and a methodical approach can mitigate these risks.
