New Haven pizza crust recipe unlocks a world of crispy, flavorful pizza perfection. This isn’t your average pie; it’s a culinary journey into the heart of New Haven’s iconic pizza, with a focus on achieving that signature crust.
From understanding the unique characteristics of the dough to mastering the baking techniques, this guide dives deep into the recipe, revealing the secrets behind its irresistible texture and taste. Get ready to elevate your pizza game!
Introduction to New Haven Pizza Crust: New Haven Pizza Crust Recipe
Forget everything you thought you knew about pizza crusts. The New Haven style, a true culinary underdog, boasts a unique texture and flavor profile that sets it apart from its Italian cousins. It’s more than just a pizza; it’s a ritual, a testament to the power of simple ingredients and meticulous technique. This isn’t your average cheesy slice; this is a deep-dish culinary experience.The New Haven pizza crust is distinguished by its incredibly thin, yet surprisingly sturdy, structure.
This unique combination of fragility and strength is a direct result of the specific dough preparation and baking process. Unlike the airy, often floppy crusts of other styles, the New Haven crust provides a satisfying, almost chewy bite. This distinctive character is what makes it a beloved local favorite, and a must-try for pizza enthusiasts everywhere.
Key Characteristics of the New Haven Crust
The New Haven pizza crust isn’t just about the dough; it’s about the whole experience. The dough is typically a simple blend of ingredients, resulting in a unique flavor and texture. Its unique character is a result of the specific blend of flour, water, and yeast used in the dough. This dough is then carefully stretched and baked to perfection, resulting in the coveted crust.
History and Origins of New Haven Pizza
The New Haven pizza style has a rich, local history. Emerging from the bustling neighborhoods of New Haven, Connecticut, it’s a testament to the city’s dedication to culinary innovation. This pizza style’s origins are rooted in the early 20th century, with stories of Italian immigrants and their culinary creations shaping the New Haven pizza as we know it today.
It wasn’t just a simple dish; it was a reflection of the community, the energy, and the unique flavor of the city.
Typical Ingredients in a New Haven Pizza Crust Recipe
A key element in creating the distinctive New Haven pizza crust is the careful selection of ingredients. The crust recipe typically uses high-quality ingredients, ensuring that each bite is a celebration of flavor.
- Flour: Often a blend of bread flour and all-purpose flour, offering the right balance of strength and chewiness. The type of flour chosen significantly impacts the final texture of the crust.
- Water: The ideal hydration level of the dough is critical for the desired outcome. A perfect balance is needed for the dough to have the right amount of elasticity.
- Yeast: Active dry yeast is typically used, adding the necessary leavening to the dough. The specific type of yeast and the proper activation process play a role in the rise and final texture of the dough.
- Salt: A crucial ingredient, salt enhances the flavor of the crust and balances the other ingredients.
Ingredients and Measurements
Nailed it! Getting that perfect New Haven pizza crust involves more than just throwing ingredients together. It’s about understanding thewhy* behind each ingredient, how they interact, and how to master the crucial steps. Let’s dive into the precise measurements and the crucial role each ingredient plays in this iconic pizza.The magic of a New Haven pizza crust lies in its delicate balance.
The right blend of flour, yeast, and other components creates a crust that’s crispy on the outside, chewy on the inside, and boasts a perfect bubbly texture. Understanding the precise measurements and the individual contributions of each ingredient is key to achieving this delicious result.
Flour Selection and Impact
Different flours offer distinct characteristics. Choosing the right one significantly impacts the final product. All-purpose flour is a common choice, but its results might not be as satisfying as a blend. Strong bread flour, with its higher protein content, results in a more structured and elastic dough. This elasticity is vital for the characteristic stretch and chewiness of a New Haven pizza crust.
- All-purpose flour: Offers a balance between strength and versatility. While it’s more forgiving, it might not deliver the same satisfying chewiness as a dedicated bread flour.
- Bread flour: With its high protein content, bread flour develops a stronger gluten structure. This leads to a more elastic and chewy dough, ideal for achieving the signature New Haven crust.
- A blend: Combining bread flour and all-purpose flour allows you to customize the texture. For example, a blend of 75% bread flour and 25% all-purpose flour can result in a well-balanced dough with a satisfying chewiness.
Yeast Activation: The Secret Ingredient, New haven pizza crust recipe
Fresh yeast is crucial for a New Haven pizza crust. It contributes to the rise and development of flavor. Proper activation is essential for a successful outcome. Don’t use old or expired yeast. It’s worth the extra effort to ensure you use fresh, activated yeast.
A meticulously crafted New Haven pizza crust recipe necessitates careful attention to ingredient ratios and baking techniques. For a truly satisfying accompaniment to such a culinary endeavor, consider exploring various cheese and wine pairings, as detailed in this comprehensive guide: cheese and wine party food. Ultimately, a successful New Haven pizza crust demands a deep understanding of the interplay between dough, sauce, and toppings.
- Fresh yeast: Using fresh yeast ensures optimal fermentation, resulting in a lighter, more flavorful crust. This is a key element in creating the distinctive New Haven pizza experience.
- Activation: Proper activation of the yeast is crucial. Dissolve the yeast in lukewarm water with a touch of sugar. This activates the yeast, allowing it to begin the fermentation process.
Ingredient Measurements and Roles
| Ingredient | Measurement | Role |
|---|---|---|
| Bread Flour | 400 grams (approx. 3 cups) | Provides structure and chewiness to the crust. |
| Warm Water | 250 ml (approx. 1 cup) | Provides moisture and activates the yeast. |
| Active Dry Yeast | 2 teaspoons (or 1 packet) | Essential for the leavening and flavor development. |
| Salt | 1 teaspoon | Enhances the flavor and helps to strengthen the dough. |
| Olive Oil | 2 tablespoons | Adds richness and helps to prevent sticking during baking. |
This table Artikels the essential ingredients and their approximate measurements. Remember to adjust the measurements based on your desired crust size. Experiment with different ratios to find the perfect combination for your personal taste.
Preparation and Mixing
The heart of any killer New Haven pizza lies in its dough. This isn’t your grandma’s yeast-and-water affair; we’re talking about a meticulously crafted, hand-kneaded masterpiece. From the initial mixing to the final proof, every step plays a crucial role in achieving that signature chewy-yet-crispy texture. This section dives deep into the precise techniques and timings required to coax the perfect New Haven pizza crust from a simple mix of ingredients.
Mixing the Dough
The initial mixing stage sets the tone for the entire process. A crucial aspect is the incorporation of the crucial ingredients to form a cohesive dough. Carefully combine the flour, water, yeast, and salt in a large bowl. Start by using a wooden spoon or spatula to gradually incorporate the ingredients. Then, transition to your hands to achieve a more thorough mixing.
This process will help develop the gluten structure. The goal is a shaggy, slightly sticky dough. Observe the dough for signs of a smooth texture and elasticity. This will indicate the dough is ready for the next step.
Kneading and Developing the Dough
Kneading is the workhorse of dough development. It’s not just about mixing; it’s about developing the gluten network within the dough, which is essential for achieving that desired chewiness. A well-kneaded dough will be smooth, elastic, and have a springy bounce. To begin, turn the dough out onto a lightly floured surface. Gently fold and stretch the dough, pressing down firmly on it to develop the gluten.
Rotate the dough, and repeat this process for 8-10 minutes. Observe how the dough changes texture and becomes smoother and more elastic.
Shaping the Dough
Various methods exist for shaping the dough into a pizza crust. The most common method involves stretching the dough into a round or slightly oval shape, gradually increasing the diameter while maintaining the thickness and even distribution of the dough. For a more unique approach, you can use a rolling pin or a flat spatula to shape the dough into a round or rectangular form.
Resting and Proofing the Dough
Resting the dough is an integral part of the process, allowing the gluten to relax and the yeast to ferment. This step is essential for a tender, well-developed dough. Place the shaped dough in a lightly oiled bowl, cover it with plastic wrap, and let it rest in a warm place for 30-60 minutes. This period allows the dough to rise slightly and become more pliable.
Proofing
Proofing, the final stage before shaping the pizza, is a crucial part of the dough development process. Proofing allows the yeast to continue its fermentation, producing carbon dioxide that makes the dough airy and light. After the initial rest, place the dough in a warm place for an extended period, typically 1-2 hours. A well-proofed dough will have significantly increased in size, showing a light and airy texture.
This proofed dough is now ready to be transformed into a delicious pizza crust.
Baking and Cooking Techniques
Nailed that dough, now for the fiery finish! Baking a New Haven pizza isn’t just about the ingredients; it’s about theritual* of transforming a simple dough into a crispy, flavorful masterpiece. The right temperature, the right oven, and the right techniques are key to unlocking that signature New Haven pizza experience.The heart of a New Haven pizza lies in its perfectly crisp crust.
Achieving this requires precise baking, harnessing the power of high heat and careful attention to detail. A properly baked crust boasts a satisfyingly charred exterior, a testament to the oven’s intense power and the dough’s resilient nature.
Ideal Baking Temperature and Time
Achieving the ideal crispiness and satisfying char on a New Haven pizza requires a high-heat environment. A temperature range of 750°F to 900°F (400°C to 480°C) is considered optimal for this type of pizza. The baking time is crucial and depends heavily on the oven and the specific pizza. A pizza usually needs only a few minutes to achieve the desired result, often around 2-3 minutes per side.
Keep a close eye on the progress, as overbaking can quickly lead to a burnt crust.
Baking Equipment
A true New Haven pizza demands a dedicated baking environment. A brick oven is the traditional choice, offering the intense heat and even distribution needed for a perfectly cooked crust. Alternatively, a pizza stone placed in a conventional oven can mimic some of the oven’s characteristics. A pizza stone allows the pizza to cook evenly, leading to a crispier crust compared to direct oven baking.
The crucial role of the stone or oven is to provide a high-heat environment that allows the crust to achieve a satisfying char. The intense heat quickly cooks the dough’s surface, creating that characteristically crisp exterior while keeping the inside soft and gooey.
Preventing Soggy or Burnt Crusts
Maintaining the perfect balance between crispy and soft is a delicate act. A crucial step is ensuring even heat distribution. If your oven or baking stone doesn’t provide even heat, you might encounter parts of the crust burning while other parts remain soggy. Using a pizza peel to move the pizza around the stone or oven helps distribute the heat more effectively.
Preheating the stone is absolutely essential, ensuring a consistent temperature throughout the cooking process. Another key tip is to carefully monitor the baking time. Using a timer and frequent visual checks is crucial for preventing overcooking, which can lead to a burnt crust.
Crust Variations and Alternatives
From basic flour to funky flours, the New Haven pizza crust’s adaptability is its secret weapon. It’s more than just a vessel for the iconic sauce and cheese; it’s a canvas for creativity. Experimenting with variations lets you personalize your pizza experience, dialing in the perfect balance of texture and flavor.
Flour Variations
Different flours impart distinct characteristics to the crust. The classic recipe often relies on a blend of all-purpose and bread flour, but exploring alternatives can lead to interesting results. Understanding the impact of different flour types on the final product is crucial.
| Flour Type | Impact on Crust | Example |
|---|---|---|
| Whole Wheat Flour | Adds a nutty, earthy flavor and a slightly denser texture. | A good option for those seeking a healthier, more robust crust. |
| High-Protein Bread Flour | Results in a chewier, more substantial crust. | Ideal for achieving a thicker, more substantial crust, especially for deep-dish variations. |
| Semolina Flour | Creates a slightly coarse, crumbly crust with a distinctive texture. | This can add a unique character, though it might alter the overall consistency. |
| Cornmeal Flour | Provides a pleasant crunch and a distinct corn flavor, adding a unique depth. | Suitable for a crust with a noticeable corn flavor, appealing to those who enjoy cornmeal in other dishes. |
Water Variations
The type of water used can subtly alter the crust’s final product. Filtered water, often preferred in baking, can influence the dough’s rise and elasticity. Tap water, on the other hand, might introduce minerals that can affect the crust’s taste and texture. Using different water types requires careful consideration.
Alternative Ingredients
Enhancing the crust’s taste and texture involves adding specific ingredients. Experimenting with different additions can create a pizza that’s truly one of a kind.
- Garlic powder: Adds a pungent, savory flavor to the crust, enriching its overall profile.
- Onion powder: Provides a subtle sweetness and depth, enhancing the crust’s complexity.
- Oregano: A common Italian herb, it brings a fresh, herbaceous note to the crust.
- Olive oil: Improves the crust’s tenderness and provides a rich, nutty flavor.
Cheese Variations
Different types of cheese profoundly affect the crust’s texture and flavor. The melting point and flavor profiles of various cheeses significantly impact the pizza’s final taste. Choosing the right cheese is vital for a balanced experience.
- Mozzarella: A classic choice, mozzarella melts beautifully, adding a mild, creamy flavor.
- Provolone: Its firm texture contrasts with the crust and provides a slightly sharp flavor.
- Fontina: Fontina melts into a stringy, gooey consistency, creating a unique texture.
- Parmesan: Its sharp flavor adds a distinctive zest, especially when grated over the finished pizza.
Sauce Variations
Different sauces complement the New Haven pizza crust in unique ways. The sauce’s acidity, thickness, and flavor profile can significantly alter the overall pizza experience. Choosing the right sauce is key.
- Tomato Sauce: The traditional choice, tomato sauce offers a classic balance to the crust.
- Marinara Sauce: A vibrant, slightly tangy sauce that enhances the pizza’s flavor.
- White Sauce: A creamier, richer alternative that balances the crust’s flavors.
- Spicy Sausage Sauce: A flavorful sauce that provides a heat level to complement the crust’s characteristics.
Troubleshooting Common Issues
Nailed the dough, prepped the sauce, ready to unleash your New Haven pizza masterpiece? But hold on, what if your crust isn’t quite right? This section is your troubleshooting guide to banish those pizza-making nightmares and ensure your crust is crispy, chewy, and perfect every time. We’ll tackle common pitfalls and give you the tools to craft the ultimate New Haven pizza experience.Facing a tough crust or a soggy bottom?
A meticulous approach to crafting the perfect New Haven pizza crust requires precise ingredient measurements and a thorough understanding of the dough’s development. This attention to detail is mirrored in the refined residential market, particularly in properties like those available in Pound Ridge, NY, where discerning buyers seek quality and craftsmanship. Homes for sale in Pound Ridge, NY often showcase a similar dedication to quality construction and design.
Ultimately, the pursuit of excellence, whether in a culinary masterpiece or a prestigious residence, demands similar meticulous care and attention to detail, essential components of the New Haven pizza crust recipe.
Don’t fret! Understanding the nuances of the baking process is key to achieving that ideal New Haven pizza texture. By identifying the potential issues and implementing the right solutions, you’ll be on your way to pizza perfection in no time.
Tough Crust
A tough crust can be a real bummer, leaving your pizza lacking the desired chewiness and tenderness. Understanding the factors that contribute to a tough crust will allow you to avoid this common issue.
- Insufficient Hydration: If your dough isn’t hydrated enough, the gluten strands won’t develop properly. This results in a tough, dry crust. Ensure your water is at the right temperature for optimal hydration, and adjust the amount of water in your recipe as needed to achieve the desired dough consistency. This might involve experimenting with slightly higher water content.
- Over-Mixing: Over-mixing develops gluten strands too much, leading to a tough and dense crust. Mix the dough just until combined, not over-mixing it. A smooth, slightly tacky dough is a sign of a well-mixed and properly hydrated dough.
- Incorrect Baking Temperature: Baking at too low a temperature will prevent the crust from achieving the desired crispiness. Ensure your oven is preheated to the correct temperature, and keep a close eye on the baking process to ensure it reaches the correct temperature for achieving that perfect golden brown color. A high temperature, for example, may lead to a tough crust and an unevenly cooked pizza.
Soggy Crust
A soggy crust is a recipe for disappointment, as the moisture on the bottom can lead to a mushy and unappealing pizza. A few key factors contribute to this problem.
- Excessive Moisture in the Dough: A dough with too much water will lead to a soggy crust. Carefully measure your ingredients to ensure the dough has the correct moisture level. The dough should be smooth and slightly tacky, not sticky or overly wet.
- Insufficient Baking Time: If the pizza isn’t baked long enough, the bottom may not have had enough time to crisp up, leading to a soggy crust. Monitor the baking time carefully, adjusting it as needed to ensure the crust is cooked through. Don’t rush the baking process.
- Too Much Sauce: Too much sauce can weigh down the crust, making it soggy. Use a thin layer of sauce and evenly distribute it to prevent excess moisture. If you notice the sauce has spread too much, you may want to reduce the amount of sauce used.
Baking Mistakes to Avoid
These common baking mistakes can significantly impact the quality of your New Haven pizza crust.
- Not Preheating the Oven Properly: A cold oven can lead to unevenly cooked crusts. A properly preheated oven ensures a consistent baking temperature, which leads to a more even and crisp crust.
- Overcrowding the Oven: If you place too many pizzas in the oven, it can affect the temperature and baking time, leading to an uneven crust. Ensure the pizzas are evenly spaced out in the oven, to prevent them from touching each other, which can lead to uneven baking.
- Opening the Oven Door Too Often: Opening the oven door too frequently during baking can cause the temperature to fluctuate, impacting the cooking process. Keep the door closed as much as possible to maintain the temperature and ensure proper cooking. If you need to check on the progress, open it only for short periods.
Improving Texture and Appearance
Achieving a perfect New Haven pizza crust involves more than just avoiding mistakes. Here are some tips to elevate the texture and appearance of your crust.
- Proper Dough Resting: Allowing the dough to rest before shaping and baking allows the gluten to relax and develop properly, leading to a more tender and less tough crust. The dough should rest for a period of time, which can vary from a few hours to overnight, depending on the specific recipe.
- Using a Pizza Stone: A pizza stone helps to create a crispy crust by transferring heat evenly and quickly to the bottom of the pizza. Using a pizza stone will help you achieve that perfect, crispy New Haven crust.
- Baking on a Hot Surface: A hot surface like a pizza peel or a metal baking sheet ensures that the bottom of the crust cooks quickly and evenly. A hot surface is critical for developing the perfect texture.
Visual Representation
Unleash your inner pizzaiolo! Visualizing the process is key to mastering New Haven-style pizza. Seeing the dough transform from a simple mix to a crispy, golden masterpiece can be incredibly motivating. These visual aids will help you understand each step and predict potential pitfalls.
Stages of Pizza Crust Creation
Visualizing the steps in the pizza crust-making process helps tremendously in understanding the nuances of each stage. A clear progression from start to finish is vital for success.
| Stage | Description | Image Description |
|---|---|---|
| 1. Mixing the Dough | Combining flour, water, yeast, and salt in a bowl. The dough will be initially shaggy and inconsistent. | A close-up shot of a mixing bowl filled with a slightly shaggy, light-gray dough. A wooden spoon or spatula is visible, indicating active mixing. |
| 2. Kneading the Dough | Developing the gluten in the dough through repeated stretching and folding. The dough will become smoother and more elastic. | A medium shot of a person’s hands kneading a ball of dough on a lightly floured surface. The dough is visibly smoother and more consistent compared to the initial mixing stage. |
| 3. First Rise (Proofing) | Allowing the dough to rest and rise in a warm, draft-free place. This allows the yeast to ferment and the dough to increase in volume. | A close-up shot of a bowl covered with plastic wrap, containing the risen dough. The dough has visibly expanded and is puffy, with air pockets throughout. |
| 4. Shaping the Dough | Creating the desired pizza shape (usually a round or square) from the risen dough. Carefully shaping the dough is crucial for even baking. | A close-up of a person’s hands gently shaping a ball of dough into a round, flat disc on a floured surface. |
| 5. Baking the Pizza | Placing the shaped dough on a hot pizza stone or pan and baking until golden brown and crispy. | A medium shot of a pizza crust on a hot pizza stone or pan, showing the edges starting to turn golden brown and crisp. |
Comparing Crust Types
Different crust types, while all following a similar basic process, have distinct characteristics. This comparison helps in understanding the variables.
| Crust Type | Image Description | Key Characteristics |
|---|---|---|
| Thin Crust | A close-up shot of a thin, crispy pizza crust. The crust will have a noticeable crispiness. | Very thin, crispy, and often cooked quickly. Allows the toppings to be more prominent. |
| Thick Crust | A close-up shot of a thick, puffy pizza crust. The crust has a visibly thicker and more substantial texture. | Thick and chewy, providing more substance to the pizza. |
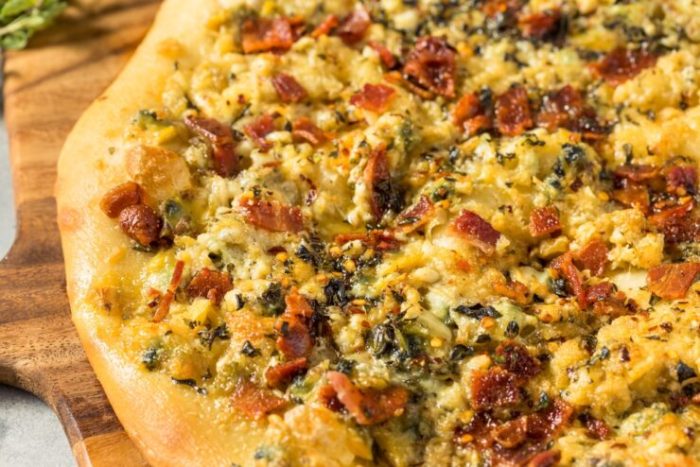
| New Haven-Style | A close-up shot of a New Haven-style pizza crust. The crust is typically quite thick and has a deep golden brown color, with some areas potentially slightly charred. | Characterized by a thick, crispy, slightly charred crust with a soft interior. |
From Raw Dough to Finished Product
This visual representation will showcase the journey of the dough, highlighting the transformation from raw dough to a finished New Haven-style pizza crust.
| Stage | Image Description |
|---|---|
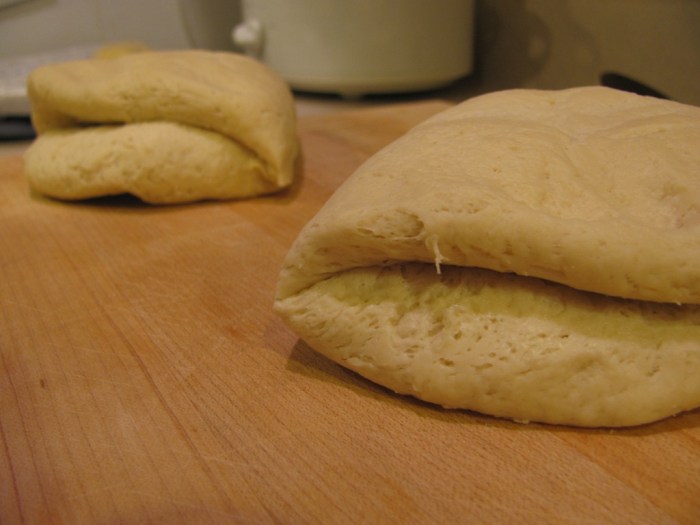
| Raw Dough | A close-up shot of a ball of raw, uncooked dough. |
| Kneaded Dough | A close-up shot of the kneaded dough, showing its elasticity and smooth texture. |
| Rising Dough | A close-up shot of the risen dough, showing its increased size and air pockets. |
| Shaped Dough | A close-up shot of the shaped dough, showing its final form. |
| Baked Crust | A close-up shot of the baked pizza crust, showing its golden brown color and crisp texture. |
Final Conclusion
Conquering the New Haven pizza crust recipe is achievable with this comprehensive guide. We’ve covered everything from the essential ingredients and preparation methods to baking techniques and troubleshooting common issues. Now, go forth and create your own masterpiece!
Essential Questionnaire
What’s the secret to a perfectly crisp New Haven crust?
A crucial aspect is using a baking stone or pizza stone. The intense heat distributed evenly across the stone helps create a crispy, golden-brown crust.
How long should I proof the dough?
The proofing time depends on the temperature and the type of yeast used. Generally, you should allow the dough to proof until it doubles in size, about 1-2 hours.
Can I substitute all-purpose flour for bread flour in this recipe?
While possible, bread flour is highly recommended for the New Haven style. It provides the structure and chewiness essential for the perfect crust.
What kind of water should I use for the dough?
Ideally, use lukewarm water. The temperature is key for activating the yeast effectively and promoting proper fermentation.
